
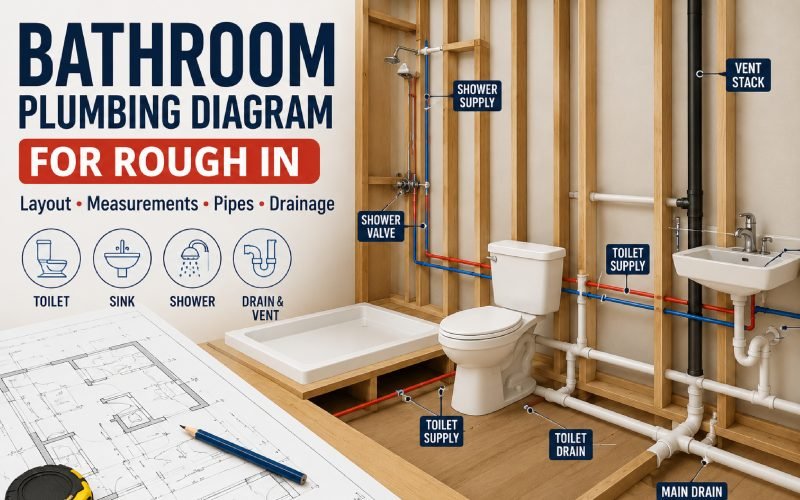
Planning a new bathroom or remodeling an old one starts with proper plumbing. A bathroom plumbing diagram for rough in shows where every drain, water supply line, and vent pipe should go before walls and floors are finished. A small mistake at this stage can lead to leaks, poor drainage, or expensive repairs later.
This guide explains the basics of rough-in plumbing, common measurements, and how to understand a bathroom plumbing diagram with simple examples.
What Is a Bathroom Plumbing Diagram for Rough In?
A bathroom plumbing diagram for rough in is a blueprint that shows the location of:
- Toilet drain
- Sink drain
- Shower or bathtub drain
- Hot and cold water supply lines
- Vent pipes
Plumbers install these pipes before drywall, tile, and bathroom fixtures. After inspection, the walls are closed and the fixtures are connected.

Main Parts of a Bathroom Plumbing Diagram
Every layout bathroom plumbing diagram includes three important systems.
| Component | Purpose |
|---|---|
| Drain pipes | Carry wastewater to the sewer |
| Water supply lines | Deliver hot and cold water |
| Vent pipes | Allow air into the plumbing system for smooth drainage |
A proper vent system prevents slow drains, bad odors, and gurgling sounds. Plumbing codes require every fixture to connect correctly to the drain and vent system.
Bathroom Plumbing Diagram with Measurements
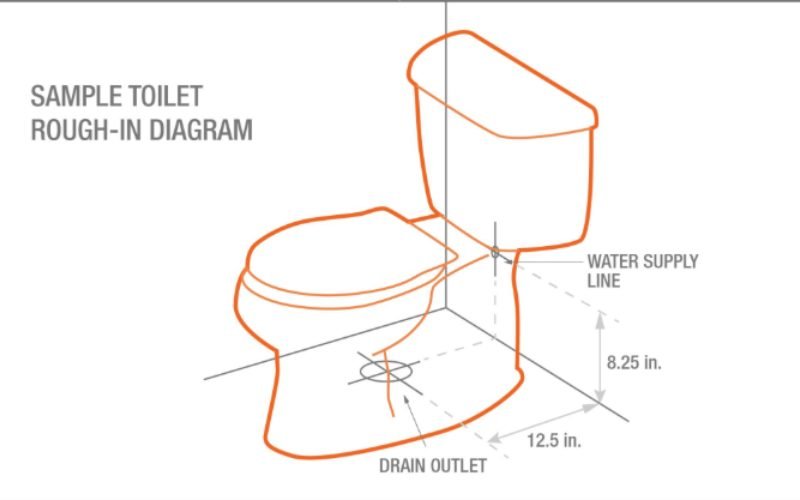
The table below shows common rough-in dimensions used in many residential bathrooms. Always confirm your local plumbing code before installation.
| Fixture | Standard Measurement |
|---|---|
| Toilet rough-in | 12 inches from finished wall to flange center |
| Toilet side clearance | Minimum 15 inches |
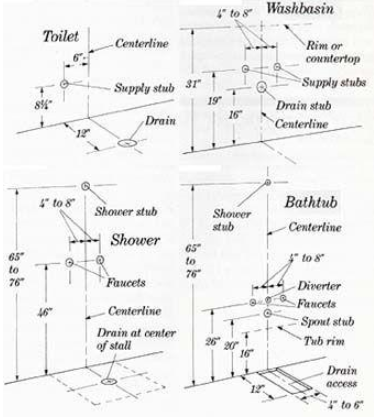
| Sink drain height | 18 to 20 inches above floor |
| Sink water supply | About 21 inches above floor |
| Shower valve | 42 to 48 inches above floor |
| Shower head | Around 80 inches above floor |
| Shower drain | Center of shower base |
These measurements match common plumbing practices used by builders and manufacturers. (The Home Depot)
Bathroom Plumbing Diagram with Shower

- 2-inch shower drain
- P-trap below the shower
- Hot and cold supply lines
- Mixing valve inside the wall
- Vent connection to the drain system
The shower drain should slope about 1/4 inch per foot toward the main drain to help wastewater flow correctly.
Typical Bathroom Plumbing Layout
A simple bathroom normally places fixtures close together.
      Vent Stack
          │
Sink ─────┼──── Toilet
   │              │
   │              │
 Shower ───────── Main Drain
Keeping fixtures near one another reduces pipe length, lowers material costs, and improves drainage efficiency.
How to Read a Bathroom Plumbing Diagram
Follow these simple steps.
1. Find the Main Drain
This is the largest pipe in the system. Most toilet drains connect directly to it.
2. Locate the Water Supply Lines
Hot and cold water lines usually run inside the wall and connect to sinks and showers.
3. Check the Vent Pipe
The vent travels upward through the roof and balances air pressure inside the drainage system.
4. Verify Measurements
Measure every fixture location before cutting flooring or framing. Even a one-inch error may prevent fixtures from fitting properly.
Common Rough-In Mistakes
Many homeowners make the same mistakes during installation.
- Measuring from unfinished walls instead of finished walls.
- Forgetting the plumbing vent.
- Using incorrect drain pipe sizes.
- Placing the shower drain off center.
- Ordering fixtures before confirming rough-in measurements.
Checking your layout twice before installation saves time and money.
Helpful Planning Tips
Before starting your bathroom project:
- Choose fixtures before plumbing begins.
- Draw a simple floor plan with measurements.
- Leave enough space around the toilet and vanity.
- Follow local plumbing codes.
- Schedule a rough-in inspection before closing the walls.
If you are also planning the room layout, this guide to interior design trends and planning can help you organize your bathroom more efficiently:
Why Rough-In Plumbing Matters
The rough-in stage forms the foundation of the entire plumbing system. Correct drain placement, proper venting, and accurate supply line locations help fixtures work efficiently for many years.
Changing pipe locations after tile and drywall are installed often requires demolition, making repairs much more expensive than careful planning during rough-in.
Final Thoughts
A well-designed bathroom plumbing diagram for rough in helps plumbers install pipes correctly before the bathroom is finished. By understanding drain lines, water supply pipes, vent connections, and standard measurements, you can avoid costly mistakes and ensure every fixture fits as planned.
Whether you are building a new bathroom or renovating an existing one, always verify measurements, follow local plumbing codes, and inspect the rough-in before closing the walls.